Tuesday, May 27, 2014

Sewing paw pads
 
 
Wrapping the thread over the top of the paw

Push the needle through from the top of the paw and come out at the bottom of the purple pair of pins. Wrap the thread over the top again. Hold the thread tight and keep the paw pads you have sewn shaped.

Push the needle back through the paw and come out at the base of the pink pin pair. Pull the thread through and keep it tight.
 
Another picture to show how we wrap the thread over the top of the paw.

The next stage is to start sewing the base of the pads to pull up the toes. You are still using the same length of thread.

After forming the last paw edge, bring the needle back through the paw at the base of that last stitch. Pull the thread all the way through. Keep that tension on the thread!

The needle is pushed back through the paw from the base of the outer pin stitch up to the pink pin. You are now working to the edge of the paw pad where the ultra suede and plush meets and not wrapping it over the top of the paw. Keep tension on the thread. As you pull this tight the first toe will be formed.
 
Push the needle back through the paw edge from the pink pin down to the base of the pad of the next pin over. This means you are making a small stitch at the point of the pink pin. It will help keep your tension in place too. Keep stitching from the base of the long paw stitch up to the top edge where each pin is. At each pin you place a small stitch and move over to the next base of a pad. Keep pulling the stitches tight and forming toes as you go along.
Keep stitching up and down from the base of the stitch in the pad to the edge of the fur and ultra suede.

Keep pulling the thread tight as you go

When all the toes are formed tie off you thread and celebrate!

The paw from the top looks a lot flatter and fatter. The paw on the left has toes and the paw on the right is next...


Thursday, May 15, 2014

Making the sculpted or puffy paws on a stuffed animal or bear:

This is a style of "toes" I love doing on any animal- dragon, dog, bear. It is time consuming and you have to work accurately but so worth it. There are several tricks to do this effectively and I am sure there are many ways to do this differently  too : ) This is my way...
Here is one finished doggy pad next to an unfinished one. The paw pad is slightly shaped to be wider at the top than the bottom and this one is ultra suede. I have done this style paw pad on several animals and several different fabrics. The technique is the same for all fabrics, but stretchy fabrics work better. Felt does tend to pucker rather than make the pads smooth.

Here is how I start:
1. I have cut and sewn all parts and turned the leg right side out. I now stuff the toe area of the leg and I do this VERY LIGHTLY. You do not want a firmly stuffed toe area as this will not allow the fabric and embroidery thread to pull in to form the toes. I read somewhere that the feel of a ripe tomato is a good comparison to aim for. I am pretty sure it is Nancy Tillberg of KranBearys who said that in her book 101 Bears to Make. This is the first trick- do not overstuff. Get the stuffing even all over the paw too paying attention to the seam edges.

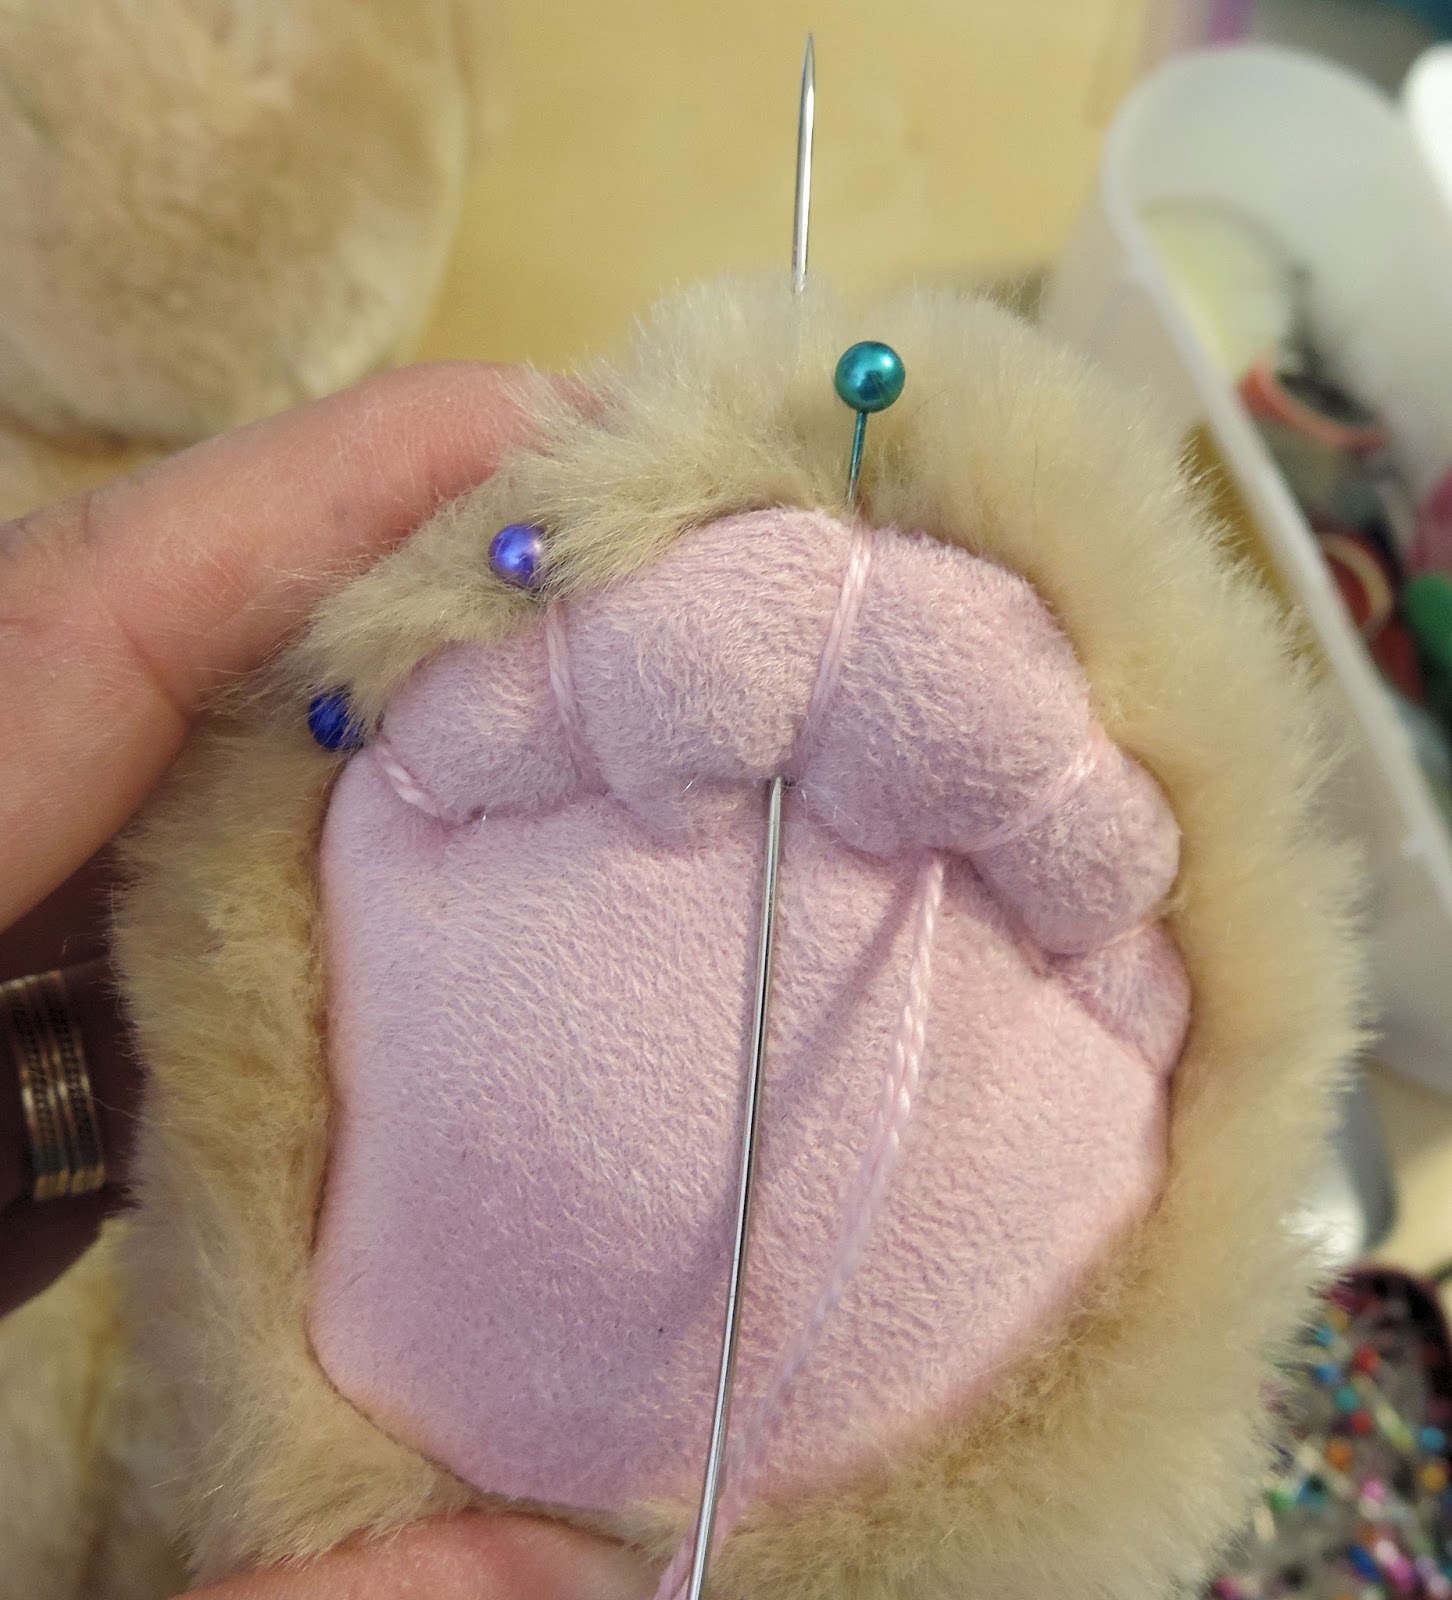
2. You need a long doll needle: 7 inches or so, nothing shorter than 4 inches unless you are doing a small animal then it does not matter. I use embroidery floss that matches my paw base color- here it is all pink. Use a strong thread to do this as you will be pulling hard on it and normal sewing thread will break. Upholstery thread is also a good choise. You can use a contrasting thread to add some zizzle, but remember that you have to work very accurately to do this as any imperfection will show up. I thread my needle a little differently here too.
My kit to do the paw pads

Threading the needle
 
Start with a long piece of thread- always longer than you think. For this puppy with a large paw my folded length was 30 inches (75 cm) - so original length was 60 inches. Fold your strong thread in half. I now thread the needle by pulling the two cut ends though the eye and leave a tail of about 2 inches. The folded loop is all the way on the other end. This will help me start my paw pad sewing without having to tie a knot.

3. Mark your sewing points on the pad. I do this using pins with colored heads.
Paw pad ready to pin

 
How to evenly space the pads- use something like your finger to get the same size space each time
 
 
Pins in place to show where the thread must go
 
I want to end up with 4 puffy toes so I use 5 pins across the top of the paw pad. The first pin I place is the one on the center top edge of the paw. The green one in the picture. Next place 1 pin at equal distances from the center green pin, one on each side of the center pin (the pink and blue pins). Lastly place  more pins - again an equal distance from the last pins (the purple pins). The gap between each pin should be the same all the way. The shape of the pad helps make the outer paws seem smaller when we sew. Now place a pin that marks how deep you want the paw to go. My yellow pin.

4. The needle is pushed through the paw from the top - use the center line of the paw as a guide and push the needle through to the gold pin that marks how deep you want to go for you pads. Pull the needle but do not pull the thread all the way through.
Needle through paw
 
The needle now loops over the top of the paw and you push the needle through the loop at the end of your thread. Now pull the thread tight. By going though that loop your thread is now secure and you do not need to tie a knot.

 
thread through the loop to secure

Pull thread tight
Pull the thread tight. On the other side of the paw you will start to see a shaping happening. Push the needle through the fabric again- go in at the center seam again in the same spot you started at but come out in the paw pad.The needle needs to be the depth down (yellow pin) but in line with one of the second pins you put in place. Wrap the thread over the top of the paw.  Push the needle from the top of the paw back through to the under side of the paw in line with the outer most pin on the one side. Remember to go down to the depth of your pin. The stitches are angled slightly. You need to keep the tension on your thread that is shaping the edges of the pads as you go. The thread is wrapped straight over the top of the paw and not to the middle seam. You are moving out away from the center. (Hope that makes sense. May need more photos...)
Stitching the paw pad

The stitches are wrapped all the way over the paw and slanted slightly. I think I need more photos to show this...


Thursday, May 8, 2014

Finally the finishing touches! I find that sometimes I have to lightly sand the Sculpey to get the paint to stick. I use acrylic and I stick to burnt umber, black, white and have green, yellow, blue and red on hand just in case. Use a very fine brush to paint the face, it has 5 zeros on it. My tooth fairy has whites of the eyes that are painted in, but next time I think I will plan to use a glass eye which can take the baking heat and has the white in place. I added color to the eye lids (eye lashes effect) and the eye brows. I use a micro pen with a very fine tip to add the final details for the eye brows. A good place to look when you are painting faces in is the Ball Jointed Doll (BJD) community as some of those face ups are magnificent.

His hands have age spots added in burnt umber. I glazed the toe nails with a sculpey varnish. It does look like he is wearing nail polish!

I added purple dyed cheesecloth around the wrists (the color made me think of the silicon gloves  see at my dentist office : )  ). A fine leather strip was used to tie around his foot to secure the cheesecloth on his feet in place. I did not go for shoes as he has wings...

A ultra-suede tunic finishes off his outfit. The hair is white faux fur and for his size about 1 inch in length. I had to make a cap out of soft fabric to get the exact shape to cut the fur in so that it would seem like hair. The hair was super glued in place- super glue gel is better in my opinion. I like the fancy one that comes in a container where you squeeze the tabs on the side to get a dot of glue each time. Very controlled which I need as I can easily glue my fingers together on a good day. He is balding- yes. He is old and I wanted to convey that age and experience. Maybe more wrinkles next time?

The wings have been made out of Angelina Film. I glued down fine aluminum wires (colored) with white glue to the film. Once the glue was dried I used a small heat gun and heated the film which then shrinks a bit, and changes into the most remarkable colors. Got it from Doll Makers Journey.

The wings are hot glued to the armature with hot glue. They were in place before his tunic was fitted as this tunic then helps to hide the jointed area.

At this point I made the decision for the final position of the arms and legs. As I had made his feet so big he was able to stand by himself and did not need a base of any kind. The aluminum armature which is covered in fabric allows for the arms and legs to be moved several times.

Pinterest has amazing things to look at for inspiration and a lot of great tutorials. Go explore...

Thursday, May 1, 2014

Padding the body of the tooth fairy is easy. Having used the aluminum wire and not a sculpted body- I can keep the arms and legs relatively straight and after wrapping them I can then bend them to shape. I start wrapping the wire armature with quilters batting. I used a thin batting cut into 1 or 1/2 inch wide strips and about 10 inches long. I stopped at the hand joint- the wrist, and the ankle. For the tummy I took polyester fiber filling and balled it up into an oval shape. I glued that to the batting that was on the tummy and then wrapped over that again to create a smooth shape. You can hot glue the batting to make sure it does not unravel or you can stitch it. Preference prevails here : )

Body wrapped in quilters batting
 
 
I did not wrap the ankles or wrist as I wanted the first layer of his raggedy clothing to do that, and did not want the transition to be too bulky. I used cheesecloth that I dyed in tea. It gave it a lovely creamy color. Again I cut the cheesecloth fabric into bandage sized strips- about 2 inches wide by 15 inches long. I started wrapping from the hand where I wanted the fabric to hang over his hand, and wrapped to the shoulder, securing it there. You can use hot glue or stitch it. I covered both arms and legs like this. The body has also been wrapped in cheesecloth and helps hide a lot of the gluing.  I dyed more cheesecloth in coffee- a slightly darker color and hard to see in the photos. I used this to wrap his feet as the start of his shoes.
 

Tea dyed cheesecloth wrapped on body and covering all the batting and start of shoes in place


The cheesecloth gives great texture and makes a great base for the clothing. It dyes easy and does not need a lot of die. I have a tie dye kit that uses powder dye- A small amount of powder dyes a lot of cheesecloth.